

Here are some of my favorite brushes. Most of these are are out-of-the-box brushes that come default with painter. Before you try any of these out though, use the "Brush Tracking..." feature in Preferences (edit menu on PC, Apple icon on Mac I think). Do a few strokes in the box typical of your pressure and speed and it will automatically calibrate Painter's settings to match your drawing style. If you don't do this you may not like the "feel" of a lot of these brushes.
I'll start with the brushes I like to draw with:

I use the round tip pens for inking, but I changed the Minimum Size of the brush to zero so I could have lots of scale variation. If you make these brushes very big you lose a lot of control.
The charcoal is the closest I've found to pencil if I'm touching up a pencil drawing I scanned in.
The Liquid Ink looks great but is a bit hard to control, especially when the brush size is small.
Next up, my favorite cover brushes. These brushes have little or no bleed, so it's easy to get fully saturated color:
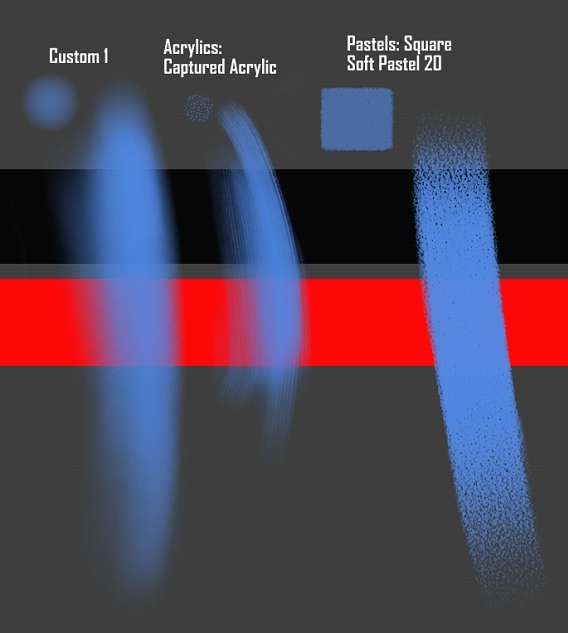

I don't use the square pastel often but it's a great brush if you want heavy texture in your strokes. I often use the fade tool (Ctrl+Shift+F) to get lighter strokes since it's at full opacity.
My favorite "painterly" brushes have heavy blending at low pressure and apply color at high pressure:

Custom 2 (settings below) is a very digital-looking painterly brush, but it gives such smooth yet slightly varied results that it can be really appealing when used correctly. This is very similar to the brush Ryan Wood uses and until a couple years ago was one of my most-used brushes.

Custom 3 (settings below) is about halfway between the palette knife and Custom 2. I haven't used this one much lately but it's a great brush (I'd forgotten, but this tutorial reminded me) and I think I'll try to use it more often.


The Digital Watercolors are really nice for initially applying color over drawings. I know Painter has some super-advanced watercolors now, but the old digital watercolors are faster and more approachable. Just remember "Dry Digital Watercolor" in the Layers menu when you're ready to paint on top of them.
One final note: Even the best brushes won't make you a better artist. What brushes can do for you:
1-Speed up your process of applying and mixing color
2-Add visual interest with your brush strokes and layering of strokes
However, I've found that 1 and 2 don't usually go well together. In fact, usually the more interesting a brush looks, the harder it is to paint with and vice-versa. So adjust your expectations accordingly: if you prefer quick and easy-to-use brushes like me, don't be terribly surprised when your final results look like the digital airbrush job on some guy's truck. Or, like me, you can just accept the cheapness of the results and be happy with the extra time you have because of it. But if you really want things to look great, you need a lot of patience.


22 comments:
Excellent. Thanks for sharing.
Thanks Sam, I have been away from painter for so long, it's nice to read a good tutorial on the software.
Thanks a million! This post was a huge help.
Have you tried artRage?
So affordable you can't not have it and the haptic quality of the brush strokes has everything except for the bristle twist and torque. At any rate closer to the real model than Painter.
http://www.artrage.com/index.html
(no affiliation other than being a customer)
Wow, what great timing for me! I just today started really playing with the Painter brushes... to realize that I have a lot to learn about Painter brushes versus PhotoShop brushes (which I know a little). Thanks for this.
Awesome post!
I've been having trouble getting the Grainy Water Blender to work the way I *thought* it was supposed to work. Your Custom 3 brush looks like just the thing I need to be using instead.
I was having trouble recreating the airbrush last night. I checked all the settings twice but whenever I would use it, it would create lumpy looking falloffs ass if the spacing were too far apart or something.
Hey , great new! , i have been waiting this a long time ago.
.It´s perfect dude!
awesome just what I was waiting for.. I love learning new things about Painter :)
Whoreray/redfive: Try this instead---select the 2B Pencil brush, then change the Method in the General tab from "Buildup" to "Cover." If that doesn't give the results you want, something is wrong with your program or settings.
DavidMaas: I just downloaded it and I'm trying it out. I like how natural the brushes look, but I don't like how they feel to use. It's like all the clunkiness of natural media without the benefits of it (picking up just the amount of paint you want on your brush with each stroke, using the same brush to accomplish multiple effects, being able to twist your brush, etc.). I'll keep working with it though, maybe something interesing will come out with more use.
Oh man thanks for taking the time to do this! I was really shy about emailing you on this but really now I can't wait to try all these out ♥
Thank you so much and keep kicking to be such an inspiration to us all.
I have Painter 9 and I am trying to change the Loaded Palette Knife Angle to Bearing, but it will not let me change anything on the Angle menu of the Brush Creator.
What are the base brushes for Custom 2 and 3?
I cannot find the Dry Digital Watercolor brush in Painter 9. Is there something that is close to it?
Melsartstuff: I had some problems with Painter 9, and honestly I'm not sure if you can change the control of the loaded palette knife in 9. I think I might have used something simple, like one of the pencils (2B pencil?) for the base of the custom brushes. As for drying the digital watercolor, I don't remember exactly but I believe the setting might be in the "Layers" window rather than the topmenu. Just click on the little arrow on the upper right and it should show up in that list.
Great post! Thanks for putting up all of the samples. I notice you mention markers for roughing out ideas, which I love to do on paper with my Copics, but I haven't had much luck replicating it in painter (and I have spent a lot of time trying). For one thing, it continuously builds to black, and FAST! I can't just get it to go to, say 30%, and stay there. Are you just using your markers right out of the can?
Great Post! Have you ever tried SAI Paint Tool? Although it's quite simpler, it is also really nice!'
Craig: Use the markers with a light color and the opacity turned way down. The one flaw with the buildup method is it goes to black so fast, but they work okay if you keep things light and don't use a ton of strokes.
lali: Never tried it, I'll have to check it out!
thanks for the post.
Could you say how to do thickness variation with the tablet in the photoshop (probably this is easy, but I can't, the thickness variation that I can is so small).
Thanks again for all blog's post!
Thanks very much for this.
I've been getting options paralysis a bit in Painter, trying to try out the brushes, and haven't really managed to decide on any yet, so I think I'll try these, should get me started I reckon :)
Hi Sam. Sorry for the late 'thanks.' I must have forgotten to subscribe to this post. I appreciate the reply. That's generally what I've tried, but I'm just so strokey when I sketch. By the way, really awesome work on here.
Post a Comment